


1. Automating Recycle Bin Emptying Using System Settings
Configuring Windows to automatically empty the Recycle Bin is remarkably simple. By tweaking a few settings, you can have your system perform this task for you, streamlining the cleanup process. It’s important to note that this feature applies to the current user account only, meaning that other users on the same computer will need to adjust the setting individually.
2. Step-by-Step Guide for Using System Settings
- Open the Settings window from the Start menu or by pressing Win + I.
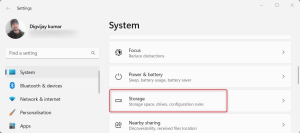
- Navigate to the System tab in the left panel.
- Scroll down and click on Storage on the right-hand side, where various data storage and management options are available.

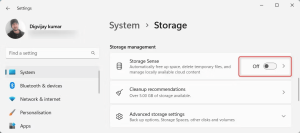
Image by ttps://www.makeuseof.com/ - Look for the toggle switch under Storage Sense. Turn it on if it’s currently off. This feature empowers Windows to automatically delete files that are no longer needed.

Image by ttps://www.makeuseof.com/ - Once Storage Sense is active, click the arrow next to it to reveal more options.
- Find the option labeled “Delete files in my recycle bin if they have been there for over.” Click the dropdown menu and select the duration after which Windows should automatically empty the recycle bin.
- Choose an appropriate duration; for example, selecting “1 day” will result in daily automatic bin emptying.
- If desired, you can also configure Windows to delete downloaded files that haven’t been opened for a specific number of days.
3. Using Task Scheduler to Automate Recycle Bin Cleaning
For those seeking more control and customization over the process, Windows Task Scheduler offers a powerful solution. This method allows you to schedule Recycle Bin emptying at specific intervals.
- Open the Run window by pressing Win + R.
- Type “taskschd.msc” and hit Enter to launch the Task Scheduler program.
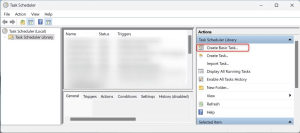
- Select “Task Scheduler Library” from the left-hand side of the window.
- Click “Create Basic Task” from the right-hand panel to initiate task configuration.

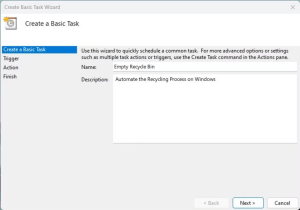
Image by ttps://www.makeuseof.com/ - Name your task (e.g., Empty Recycle Bin) and add a brief description if desired. Proceed by clicking “Next.”
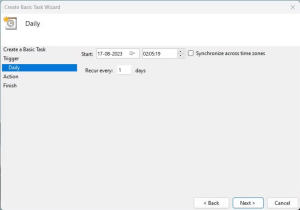
- Choose the frequency at which Windows should empty the Recycle Bin—options include Daily, Weekly, Monthly, or One time only.

Image by ttps://www.makeuseof.com/ - Set the start date, time, and recurrence details for the task.

Image by ttps://www.makeuseof.com/ - Select the action “Start a program” and proceed.

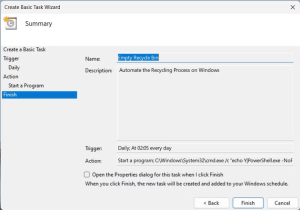
Image by ttps://www.makeuseof.com/ - In the “Program/script” box, input “C:\Windows\System32\cmd.exe.” In the “Add arguments (optional)” field, enter the command “/c ‘echo Y|PowerShell.exe -NoProfile -Command Clear-RecycleBin'” to trigger Recycle Bin content deletion.
Image by ttps://www.makeuseof.com/ - Review your settings and optionally tick “Open the Properties dialog for this task when I click Finish.”
- Complete the setup by clicking “Finish.”

4. Creating Scheduled Tasks for Recycle Bin Automation
In this article, we’ve explored two effective methods to automate the process of emptying the Recycle Bin in Windows. The first involves leveraging the system settings, which is user-specific, while the second method utilizes the Task Scheduler, offering greater control and flexibility in scheduling the cleanup process.
By implementing either of these methods, you’ll ensure that your Recycle Bin is regularly emptied, enhancing your computer’s performance and maintaining a clutter-free digital environment. Embrace the power of automation to simplify your system maintenance tasks and optimize your Windows experience.