


How to Change Language on a Chromebook: A Simple Guide
Are you looking to use your Chromebook in a language other than English? Whether you’re a multilingual user or simply need to switch languages temporarily, the good news is that changing the language settings on a Chromebook is a straightforward process. In this guide, we’ll walk you through the steps to customize the display language and keyboard input on your Chromebook, allowing you to work comfortably in the language of your choice.
Setting a New Language on Chromebook
- Access the Settings Menu: To change the display language, start by opening the settings menu. You can do this by clicking on your profile picture in the lower-right corner of the screen and selecting the gear icon for settings.
- Navigate to Advanced Settings: On the left side of the settings window, you’ll find an option labeled “Advanced.” Click on it to open a drop-down menu with additional settings.
- Select Languages and Inputs: Within the “Advanced” menu, click on “Languages and Inputs.” This is where you’ll configure your Chromebook’s language settings.
- Open the Language Selector: Under “Languages,” you’ll see the current display language, which is typically set to the default language of your Chromebook (e.g., “English (United States)”). To change it, click the “Change” button.
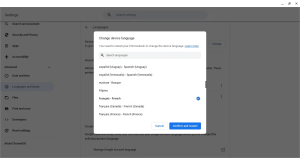
- Choose Your Preferred Language: Browse through the list of available languages or use the search function to find the language you want to switch to. Once you’ve found it, click to select it.
- Confirm and Restart: After selecting your preferred language, click the “Confirm” button. Your Chromebook will prompt you to restart to apply the language changes. Click “Restart” to reboot your Chromebook in the newly selected language.
Adding Languages for Website Content
You can also configure the languages used for displaying website content. Here’s how:
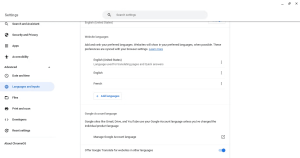
- Under “Website languages” in the “Languages” menu, you’ll typically see English as the default. Click the “Add languages” button to bring up a menu with additional languages.
- Choose the Priority of Languages: Once you’ve added new languages, you can set their priority for display. Click the “More actions” menu (represented by three dots) next to each language and use the options to move them up or down in the list.
Table: Language Settings on Chromebook
This table provides a quick overview of the steps to change the display language and keyboard input on a Chromebook.
Step Description 1. Access Settings Click on your profile picture and select the gear icon. 2. Navigate to Advanced In the settings window, click on “Advanced.” 3. Select Languages Click on “Languages and Inputs” in the “Advanced” menu. 4. Open Language Selector Under “Languages,” click “Change” to select a new language. 5. Choose Preferred Language Browse and select your desired language. 6. Confirm and Restart Click “Confirm” and restart your Chromebook. Remember to adjust priority settings for website languages.
Switch Between Keyboard Layouts on Chromebooks
Changing the keyboard language on your Chromebook is just as simple. Follow these steps:
- Go to Settings, and select “Advanced.”
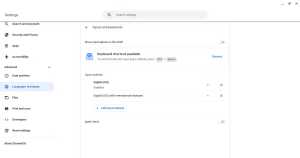
- Click on “Languages and inputs,” then navigate to “Inputs and keyboards.”
- To add new keyboard layouts, use the “Add input methods” button. This will bring up a menu with available layouts.
- While typing, you can easily switch between installed keyboard layouts by pressing the Ctrl + Space keyboard shortcut.
- Alternatively, click on the time in the lower right-hand corner of the screen, then click the dot to reveal additional options. Select “Keyboard” to see a menu of your installed layouts and switch between them.
Pro Tip: If you accidentally activate a different keyboard layout and your keyboard isn’t functioning as expected, use Ctrl + Space to cycle back to your desired layout.
Now that you’ve mastered the art of language customization on your Chromebook, you can comfortably use different languages for both display and keyboard input. Whether you’re a bilingual user or need to accommodate language preferences, your Chromebook makes it easy to adapt.
Table: Switching Keyboard Layouts
This table outlines the steps to change the keyboard layout on a Chromebook.
| Step | Description |
|---|---|
| 1. Go to Settings | Access settings from your Chromebook. |
| 2. Navigate to Advanced | Click “Advanced” for additional settings. |
| 3. Select Languages and Inputs | Choose “Languages and inputs” settings. |
| 4. Add Input Methods | Use “Add input methods” to add keyboard layouts. |
| 5. Switch Keyboard Layouts | Press Ctrl + Space or use system menu. |
Ensure you know how to switch back to your preferred keyboard layout if needed.
Remember, technology is all about convenience, and with these simple steps, you can ensure your Chromebook caters to your language needs effortlessly. Enjoy your multi-lingual computing experience!
Conclusion
Changing the language settings on your Chromebook is a breeze, allowing you to work comfortably in the language of your choice. By following the straightforward steps outlined in this guide, you can effortlessly customize the display language and keyboard input to suit your preferences and needs. Whether you’re a multilingual user or need to accommodate language preferences for different tasks, your Chromebook empowers you to adapt with ease.
Technology is all about convenience, and these simple adjustments ensure that your Chromebook caters to your language needs seamlessly. Embrace the multi-lingual computing experience and make the most of your digital device.