


Introduction
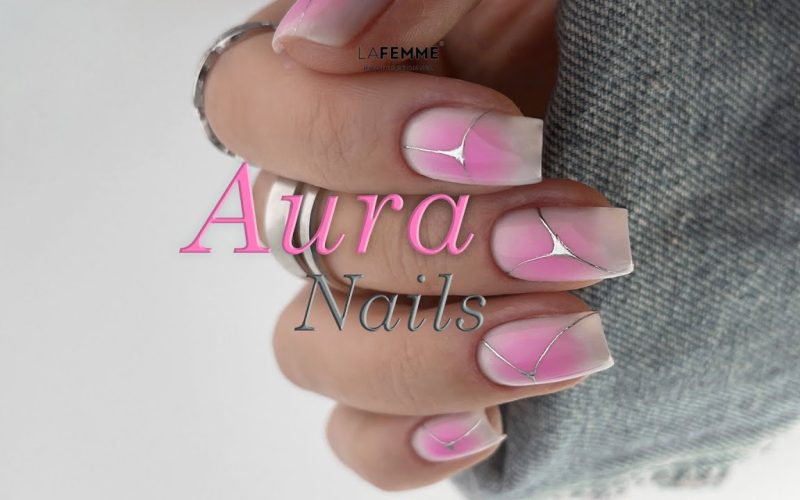
Imagine nails that glow with soft, shifting colors, as if they hold a tiny light within. Aura nail designs capture that dreamy feeling by blending shades that seem to float and shimmer. From gentle pastels to deep jewel tones, these designs make your hands look like they carry a hidden energy. Whether you’re new to nail art or a seasoned fan, aura nails offer endless ways to express your style. In this article, we’ll explore what aura nail designs are, the popular techniques artists use, tips for choosing colors, step-by-step application guidance, and care advice to keep your nails looking magical.
What Are Aura Nail Designs?
Aura nail designs borrow their name from the idea of an “aura,” the soft glow that surrounds living things in art and popular culture. In nail art, this glow is created by layering translucent gels or powders in colors that blend seamlessly. Light hits each layer differently, producing a shifting, iridescent effect. Unlike solid polish, aura nails feel alive, changing as you move your hands or catch a new angle of light. Artists often use tiny brushes or sponges to create smooth gradients. The result is a manicure that looks like a miniature sunrise, cosmic nebula, or pearl-like shell.
Popular Aura Nail Techniques
Nail artists use several techniques to achieve the aura effect. One common method is the gradient fade, where colors blend from one to another. For example, a soft pink might fade into lavender and then into pale blue. Another technique is the holographic powder application. Here, a special powder is buffed onto a tacky gel finish, creating a mirror-like shine that shifts between colors. Some artists use watercolor gel painting, diluting colored gels to paint thin, dreamy strokes that overlap. Each of these methods creates layers of color and light that define aura nails.
Choosing the Right Colors
Colors set the mood for your aura nails. Soft pastels like mint green, baby blue, and blush pink evoke calm and whimsy. Rich jewel tones such as emerald, royal purple, and sapphire give a more dramatic, mystical vibe. You can also choose metallic hues—gold, rose gold, or silver—to add a touch of glamour. When picking colors, think about how they blend. Analogous colors—those next to each other on the color wheel—create smooth fades. Complementary colors—opposite on the wheel—offer bold contrast. No matter which palette you select, the key is to layer transparently so each shade shines through.
Step-by-Step Application Guide
Creating aura nail designs at home is easier than you might think. Start by shaping and buffing your nails to remove shine. Apply a base coat and cure it under a UV lamp if you use gel polish. Next, apply a thin layer of your lightest color and cure again. Using a small brush or makeup sponge, dab a second color onto the nail, focusing on the tips or sides, then cure. Repeat with a third color if you like more depth. For a holographic look, brush a holographic powder over the tacky layer and buff gently before curing once more. Finish with a glossy top coat and a final cure. Keep layers thin for a smooth, blended appearance.
Tips for Long-Lasting Aura Nails
Aura nails can last up to three weeks when done correctly. Always start with clean, dry nails to help polish adhere. Apply thin, even layers and cure each layer fully. Use a high-quality gel top coat to seal the design and prevent chipping. Avoid exposing your nails to harsh chemicals or long soaking in water right after your manicure. If edges start to lift, gently file the lift and apply a small dot of clear gel, then cure. Finally, apply cuticle oil daily to keep the skin around your nails healthy and to prevent polish from peeling at the base.
Inspired Aura Nail Ideas

There are endless ways to customize aura nail designs. You might choose a soft sunrise palette—peach, pale yellow, and lavender—for a spring-ready look. Or go for a deep ocean theme with teal, navy, and silver for a cool, watery feel. Some artists add tiny stars or metallic flakes between layers to mimic a starry sky. Others create a smoky, gothic vibe by blending black with iridescent purple. The key is to experiment with color mixes and layering styles. Don’t be afraid to try unexpected combinations, like coral and mint or burgundy and blush, to see new aura effects.
Professional vs. DIY Manicures
Getting aura nails at a salon can cost more, but professionals often achieve smoother blends and longer wear. They use high-quality products and tools that may not be available at home. However, many DIY gel kits now include aura powders and gels. If you practice the layering steps and invest in a good lamp and top coat, you can create stunning aura nails yourself. Start with simple two-color fades before moving to more complex three-color blends or holographic finishes. Watch tutorial videos and practice on nail tips to build your skills without risking your natural nails.
Caring for Your Aura Nails
After you’ve achieved your dream aura manicure, keep it looking fresh by following a few care steps. Avoid using your nails as tools when opening cans or scratching tags. Wear gloves when washing dishes or cleaning with detergents to protect the gel from lifting. Apply cuticle oil and hand cream daily to maintain hydration, which helps prevent cracks in the polish. If you notice small chips, touch them up with matching gel polish and cure under your lamp. For a full refresh, gently file off the top coat and powder, then seal with a new layer of top coat and cure.
Conclusion
Aura nail designs bring a sense of wonder to any manicure. By blending translucent gels, powders, and colors, you can create nails that glow and shift with the light. Whether you visit a salon or try the look at home, choose colors that speak to your style and layer carefully for the best results. With simple tools, a bit of practice, and proper aftercare, your aura nails can stay bright and beautiful for weeks. Dive into this enchanting nail art trend, and let your fingertips sparkle with hidden energy and magic.