


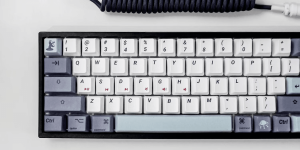
A Guide to QMK Firmware for Mechanical Keyboards
In today’s fast-paced digital world, where efficiency is paramount, every keystroke counts. For avid typists and mechanical keyboard enthusiasts, QMK, short for Quantum Mechanical Keyboard, offers a compelling solution to take control of your keyboard like never before. In this article, we delve into the fascinating world of QMK firmware, exploring what it is and how you can use it to program your mechanical keyboard for a customized, productivity-boosting experience.
What Is QMK?
Every keyboard on the market comes with built-in firmware responsible for handling key presses, LED control, and more. QMK empowers you to wield this firmware to your advantage. By flashing your compatible mechanical keyboard with QMK firmware, you gain nearly complete control over keyboard layouts and macros. Achieving this level of customization relies on three essential tools:
1. QMK Configurator
A user-friendly web-based keymap builder, QMK Configurator allows you to craft custom keyboard layouts and even control LED lighting patterns for your mechanical keyboard.
2. QMK Toolbox
Available for both Windows and macOS, QMK Toolbox is a downloadable tool. It comes into play once you’ve generated a .hex firmware file using the QMK Configurator. With QMK Toolbox, you can effortlessly flash your keyboard with the new firmware.
3. VIA Software
For added convenience, VIA Software is another downloadable tool that enables you to alter QMK layouts without the need to flash the keyboard. Please note that additional code may be required to make this feature work seamlessly.
Explore the QMK website to find a list of compatible keyboards or add your own by requesting a tag through the QMK GitHub page.
What Can You Do With QMK?
The capabilities of QMK extend far beyond typical keyboard firmware options. While you can handle fundamental tasks like customizing keyboard layouts and LED lighting, QMK also opens the door to a wealth of advanced functionalities for your keyboard. This includes access to media keys, function layers, macros, and even advanced features like auto-shift. In essence, if you’ve admired a feature on another mechanical keyboard, chances are you can replicate it using QMK. To make the most of QMK, it’s essential to familiarize yourself with its firmware and capabilities before diving into customization.
How to Program a Mechanical Keyboard With QMK
Programming your mechanical keyboard with QMK is surprisingly straightforward, and it all starts with the QMK Configurator. Here’s a step-by-step guide:
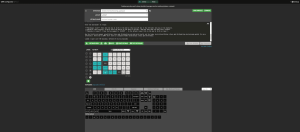
1. Building a Custom Keymap With the QMK Configurator
Visit the QMK Configurator website and select your keyboard type from the list at the top of the page. You’ll see a default layout that matches your keyboard in the middle of the screen. Below, you’ll find a set of menus containing keyboard keycodes.
To add a keycode to your keymap, drag it to the key where you want it to be assigned. Alternatively, select the key on the keymap that you wish to modify and click the desired keycode to assign it.
By default, these changes apply to the main layer (layer 0), but you can add more layers by selecting the number options on the left of the screen.
Experiment with different keycodes and configurations until you’re satisfied with your keymap. Ensure it has a name, then click the Firmware button to download a usable .hex firmware file.
2. Flashing Your Keyboard With QMK Toolbox
Now that you’ve created your firmware, it’s time to flash your keyboard. QMK Toolbox simplifies this process. Here’s how:
- Download and install QMK Toolbox.
- Open the software and ensure your keyboard is selected in the menu at the bottom.
- Click the Open button at the top and locate the .hex file you downloaded from the QMK Configurator. Depending on your keyboard’s microcontroller, you may need to adjust the MCU setting.
- Click Flash to begin the flashing process, which may take a few minutes. Look for a confirmation message within the software once it’s complete.
To ensure everything is working correctly, test your keyboard on a keyboard testing website such as KeyboardTester.com.
Keep Experimenting With Your QMK Keymaps
Using a powerful tool like QMK allows you to unlock your full productivity potential, but it’s a journey that rewards experimentation. Now that you’ve learned how to create and flash your QMK firmware, the door is open for you to experiment and fine-tune your keymaps. Discover the layout that suits your typing style and workflow, and embrace a customized typing experience that turbocharges your productivity.
Knowledge Source:
Author: Samuel L. Garbett
Samuel L. Garbett is a tech enthusiast and keyboard aficionado with a passion for exploring cutting-edge technology. With years of experience in the field, he shares his expertise to help readers harness the power of QMK firmware for mechanical keyboards.